Win3mu - Part 7 - Thunking

This is Part 7 in a series of articles about building Win3mu — a 16-bit Windows 3 emulator. If you’re not sure what this is or why I’m doing it you might like to read from the start.
This post covers “thunking” — the mechanism by which the emulated CPU calls out to C# (and indirectly to the real Windows API) and also the other direction – how callbacks from Windows execute routines in the emulated CPU.
We’re now starting to get into the real nuts and bolts of how Win3mu works.
Some Terms
From here on I’ll be using the following terms to refer to various aspects of this project:
- The “Host” — the Windows OS that the emulator is running under — typically Windows 7/8/10 x64.
- The “Emulator” — Win3mu itself (the C# code).
- The “Guest” — the Windows 3 program running under the emulator
- “Virtual” — anything related to the emulated side of the environment
- The “VM” — the entire virtual environment under which the emulated program thinks it’s running. It includes the emulated CPU, the Guest program and the emulated side of the Windows API.
Although these terms don’t match exactly to their traditional usage (eg: there’s not really an entire “Virtual Machine” in this project) the terms are familiar in meaning and make discussing the project simpler.
Also, to be clear… the code samples here are simplified to demonstrate the point — they’re based on what Win3mu’s does but they’re not the real thing.
Executing Virtual Code
I’ve previously described how the emulated CPU is made to execute code by repeatedly calling its Step() method:
while (_someCondition)
{
    _cpu.Step()
}
I alluded to a stop condition with the _someCondition variable but didn’t fully explain what controls that condition.
I’ve also previously explained about the RaiseInterrupt method which the CPU calls when an interrupt (aka: “int”) instruction is executed.
These two concepts are the basis for all calls into and out of the VM.
Calling the Program’s Entry Point
Every program has an entry point — the place in the code where execution begins. For a Windows executable the entry point is recorded in the NE header as a segment index and offset.
To start the program Win3mu simply sets the CPU’s instruction pointer and then lets it run…
// Setup the CPU's instruction pointer
_cpu.cs = selectorFromSegmentIndex(_module.NeHeader.entryPointCS);
_cpu.ip = _module.NeHeader.entryPointIP;

// Run till done
while (!_stopCondition)
{
    _cpu.Step()
}
The question remains: what is this stop condition?
A Windows 3 program typically runs like this:
- The entry point refers to startup code in the language’s runtime (eg: the C runtime library)
- The startup code initializes things and then calls
WinMain() WinMainruns the programWinMainfinishes and returns to the runtime library- The runtime cleans up and then (here’s the important bit) calls a DOS API function to end the program.
This DOS call looks like this:
mov ah,0x4c
int 21h
An interrupt! Win3mu can easily pick up on this in its RaiseInterrupt handler:
public override void RaiseInterrupt(byte interruptNumber)
{
    if (interruptNumber == 0x21 && _cpu.ah == 0x4C)
    {
        _stopCondition = true;
    }
}
Too easy — the emulator can now call the program’s entry point and run until it exits.
Calling From VM Code to C#
Now that a program is running in the VM it’s going to want to call functions in the Windows API.
Normally these API calls would call directly into Windows modules such as Kernel, User, Gdi etc… However, since Win3mu is providing emulations of these modules (by either directly emulating them or passing through to the host operating system) there needs to be a way to transition from VM code back out to the C# code of the emulator.
Enter the “Thunk”!
A thunk is a tiny piece of code designed specifically to transition between two environments and is typically machine generated.
Win3mu’s API thunks simply raise an interrupt and return:
mov ax,0x1234   ; function number to call
int 80h         ; call the emulator
retf 0x12       ; pop params and return to caller
Win3mu catches the interrupt in RaiseInterrupt and calls the appropriate function handler:
public override void RaiseInterrupt(byte interruptNumber)
{
    switch (interruptNumber)
    {
        case 0x21:
            // DOS Call
            if (_cpu.ah == 0x4C)
                _stopCondition = true;
            break;

        case 0x80:
            // Thunk calling...
            if (_cpu.ax < _systemThunkHanders.Count)
            {
                var handler = _systemThunkHanders[_cpu.ax];
                handler();
            }
            break;
    }
}
Where do these thunks come from? On starting up Win3mu allocates a block of memory from the global heap, marks it as executable code and generates the machine code for these thunks when API calls are registered:
List<Action> _systemThunkHanders = new List<Action>();
public uint CreateSystemThunk(Action handler, ushort popStack)
{
    // Capture address of this thunk
    ushort address = _systemCodeGenPos;

    // Store the handler
    ushort thunkIndex = (ushort)_systemThunkHanders.Count;
    _systemThunkHanders.Add(handler);

    // Get memory buffer
    byte[] mem = _globalHeap.GetBuffer(_systemCodeSelector);

    // MOV AX, thunk index
    mem[_systemCodeGenPos++] = 0xb8;
    mem[_systemCodeGenPos++] = (byte)(thunkIndex & 0xFF);
    mem[_systemCodeGenPos++] = (byte)(thunkIndex >> 8);

    // INT 80h
    mem[_systemCodeGenPos++] = 0xCD;
    mem[_systemCodeGenPos++] = 0x80;

    // RETF
    mem[_systemCodeGenPos++] = 0xCA;
    mem[_systemCodeGenPos++] = (byte)(popStack & 0xFF);
    mem[_systemCodeGenPos++] = (byte)(popStack >> 8);

    // Return seg:offset address of thunk
    return (uint)(_systemCodeSelector << 16 | address);
}
There are still some questions to be answered here:
- How does the Windows 3 program know to call the thunk?
- How do the C# handler functions get registered?
- How are parameters and return values passed?
These questions will be answered in a future post, suffice to say for now it’s all part of module loading and another layer that sits between the VM and the actual functions that implement the API methods.
Calling from C# into the VM
OK, so Win3mu can now call the program’s entry point and the program can call API functions. There’s one more transition that needs to be covered — callbacks. That is, the Windows host calling functions in the Win 16 program.
As an event driven operating system Windows uses callbacks to notify running programs of events. eg: moving the mouse, pressing a key, resizing a window. Typically these events are passed as messages to a Window procedure (aka: a “WNDPROC”) so we need a way to call a function in the VM.
We’ve already covered one situation in which we call VM code — calling the program’s entry point. In that case the call conveniently ends with an interrupt that Win3mu can catch. Callback functions however end with a return instruction.
One approach would be to trap “ret” instructions in the CPU but that’s error prone:
- who knows what funky call/return/stack fiddling the program might do
- it would need to count nested calls and stop and only when the top level function returns.
That approach is probably possible but Win3mu already has this interrupt mechanism so why not use it?
The approach used by win3mu is to push a return address onto the stack that will cause the function to return to an int instruction that can be seen from RaiseInterrupt.
Firstly it creates a thunk that executes an int 81h. This is the “System Return Thunk”
uint _sysRetThunk;
void CreateSysRetThunk()
{
    // Store address
    _sysRetThunk = (uint)(_systemCodeSelector << 16 | _systemCodeGenPos);

    // Get memory buffer
    byte[] mem = _globalHeap.GetBuffer(_systemCodeSelector);

    // INT 81h
    mem[_systemCodeGenPos++] = 0xCD;
    mem[_systemCodeGenPos++] = 0x81;
}
To call into the VM the instruction pointer is set to the address of the function to call, the address of the return thunk is pushed onto the stack as the return address (so the function returns to the int 81h) and run:
public void CallVM(uint lpfnProc)
{
    // Save the old IP
    var oldCS = cs;
    var oldIP = ip;

    // Setup the new IP
    cs = lpfnProc.Hiword();
    ip = lpfnProc.Loword();

    // Push address of the system return thunk
    this.PushDWord(_sysRetThunk);

    // Handle re-entrancy
    _sysRetDepth++;
    uint sysCallDepthAtCall= _sysRetDepth;

    // Process until the sys return thunk is invoked
    while (_sysRetDepth >= sysCallDepthAtCall)
    {
        Step();
    }

    // Restore instruction pointer
    cs = oldCS;
    ip = oldIP;
}
Notice that in this case a simple flag to indicate when to stop doesn’t work because it needs to handle nested transitions between the VM and the host machine. Instead, a depth counter is used and the handler for int 81h decrements the counter to indicate the current call into the VM has returned.
(In retrospect, a flag could be used so long as it’s cleared after each int 81h is handled. I prefer the depth counter as it’s explicit and makes the problem it’s addressing more obvious).
In Practice
Let’s pull all this together and dissect an actual execution trace. This example also gives some hints about how parameter passing works.
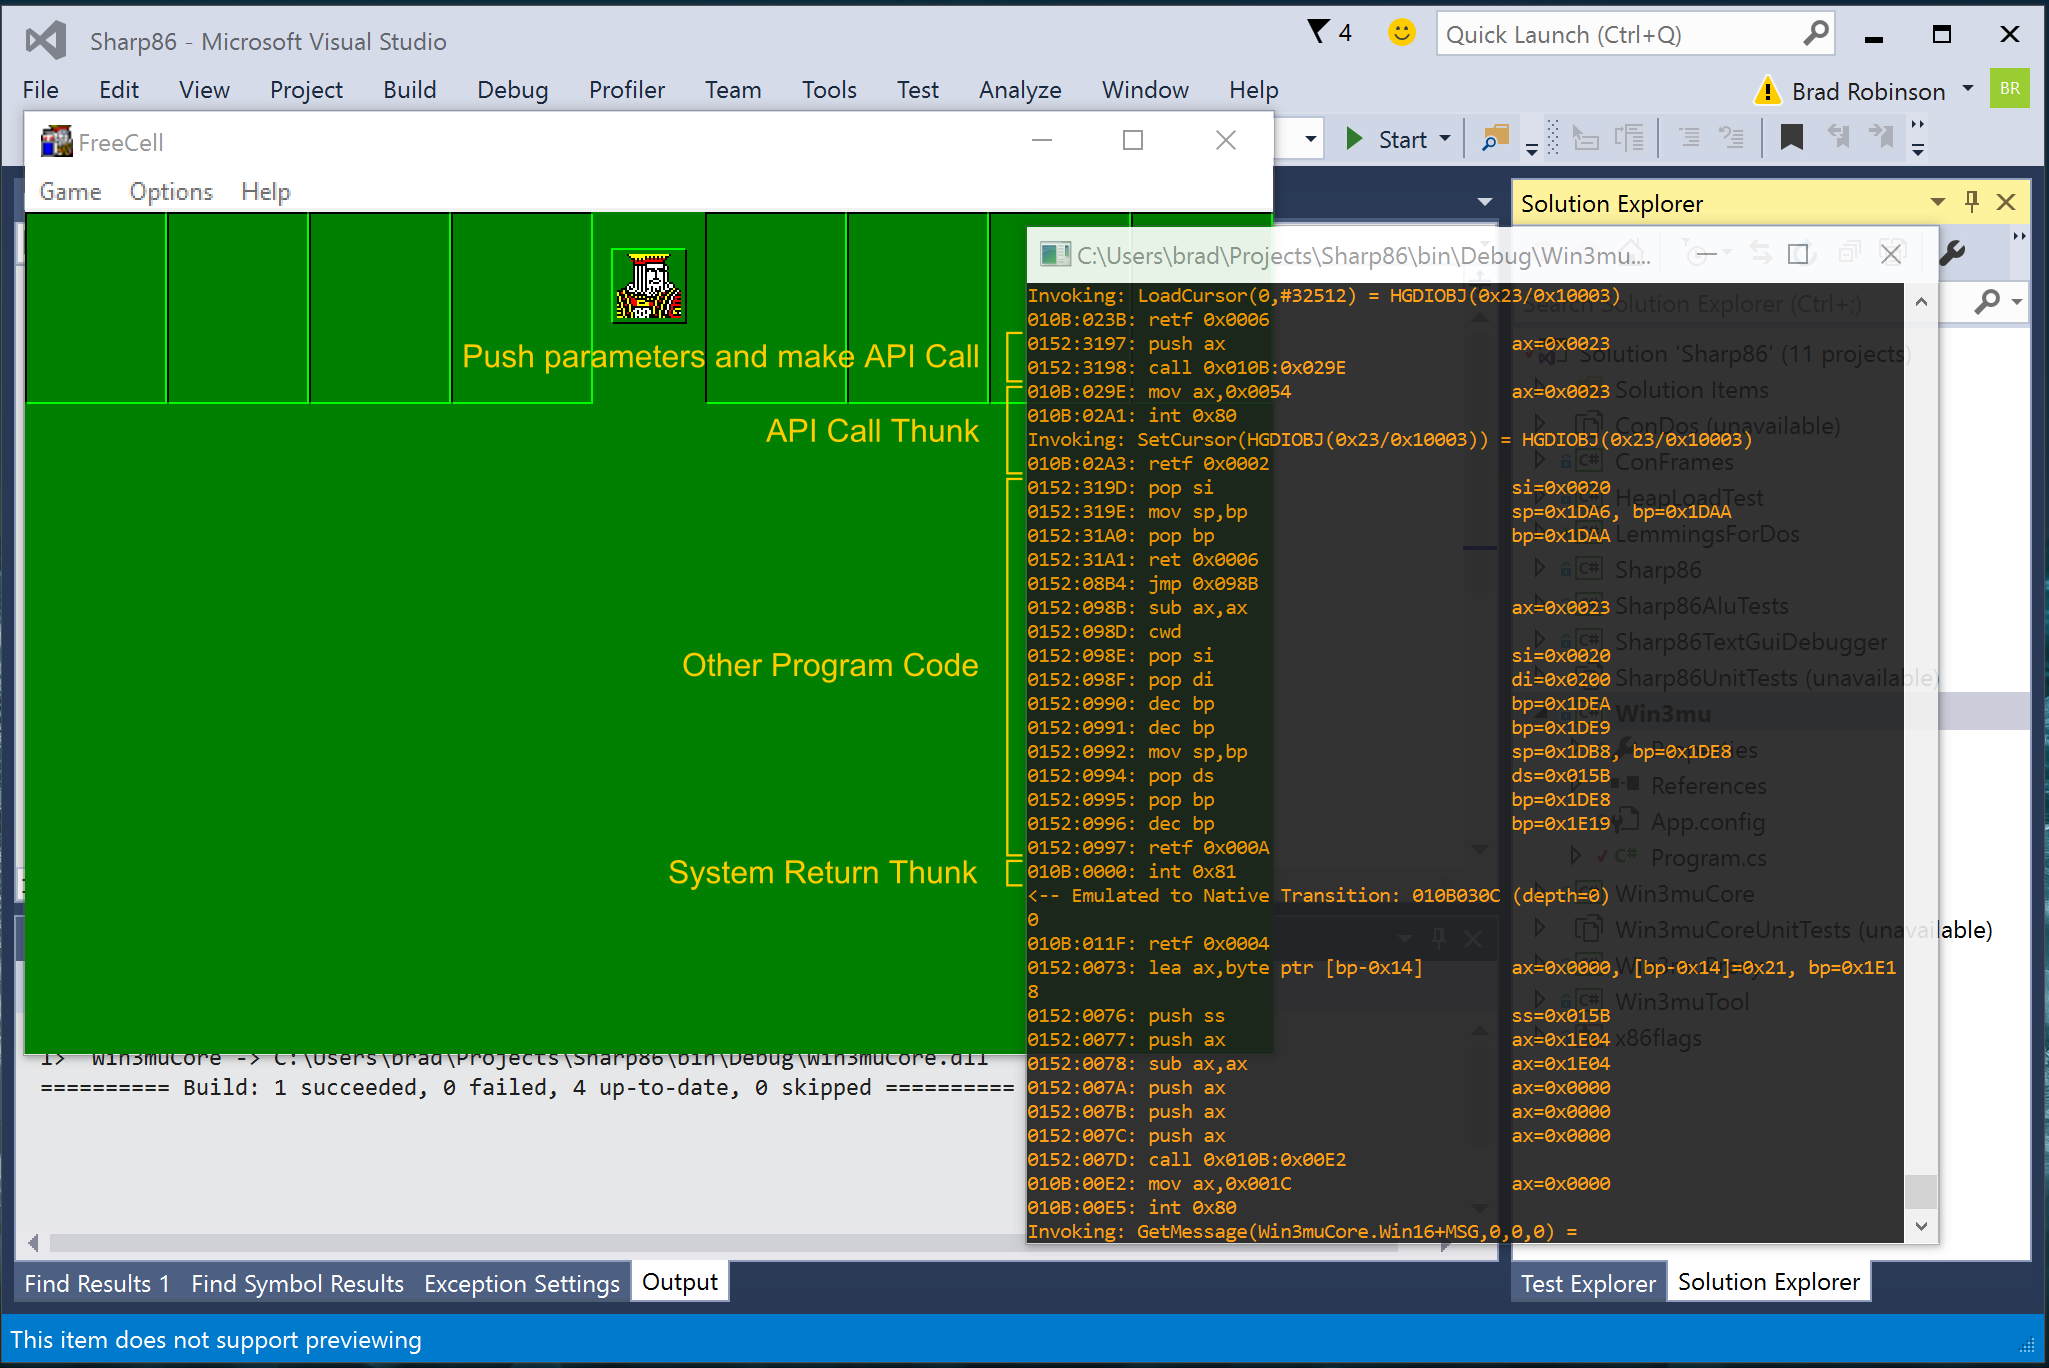
- Just before the API Call, the program pushes a parameter onto the stack “
push ax” - At
0152:3198the program makes the call, landing in the API Call Thunk - The API Call thunk sets
axto the function number (0x0054in this case) and raises interrupt0x80 - The log then shows the emulator invoking the
SetCursorfunction (note the parameter valueHGDIOBJ(0x23)matches the parameter pushed by calling program. - Execution continues after the int instruction where it returns to the calling program and pops 2 bytes of parameters off the stack.
- Other Program Code runs
- This program code was executing in a callback so when it returns (at
0152:0997) it returns to the system return thunk - At
010B:0000theint 81hinstruction causes the execution of the callback to finish.
Getting Close!
We’re now getting close to being able to run a very simple program. We’ve covered the CPU, how to read .exe files, global and local heaps and the mechanisms to call into and out of the VM.
There’s just two bits to go:
- Module Loading — actually getting code from an .exe file into memory so it can be run
- Some API methods to call
Module loading will be covered in the next article along with one really simple API method.